Of course, it was impossible not to do a nail art look in honour of this new movie. I decided to show you guys just how easy it is to get this nail art business down!
First you will need:
- Nail Polish Remover
- Cuticle Oil
- Base Coat
- Cocktail Sticks (or a striper brush)
- A Dotting Tool
- Cotton Wool
- Green, blue, darker blue, white, black and lilac nail polishes
- A small piece of sponge
Here I used three main colours on my nails and they are as follows:
- Thumb, Ring and Pinky Finger - Rimmel London I love Lasting Finish in '045 Misty Jade'
- Index Finger - O.P.I (Nicki Minaj Collection) in 'Did it on 'Em'
- Middle Finger - Nails Inc. in 'Floral Street'
Here comes the fun stuff!
First we'll look at Mike Wazowski in all his one-eyed glory...
.jpg)
To do this you need to take your largest dotting tool and dip it in white nail polish. Taking this white polish you need to dot it in a large circle a little above the halfway point on your index fingernail. This will be Mike's beautiful eye! After the white has dried, take the smaller end of your dotting tool and dab a little circle of blue into the centre of the white circle creating the iris. Then take a cocktail stick and paint an even smaller circle of black inside the blue making the pupil of the eye. Once the eye is done you just take a striper brush (or another cocktail stick) and take your black nail polish. Paint a small curved line beneath the eye as this will make Mike's toothy grin! Using your cocktail stick again take a white polish and dot little teeth along the top of Mike's mouth. Ta dah! Mike Wazowski is now smiling up at you!
Next we have James P. Sullivan, or 'Sulley'.
.jpg) This was far less time consuming to do. Apply the following steps to all the fingers painted in your lighter blue colour (in my case, 'Misty Jade'). Take a small sponge (you could even cut the corner off of a kitchen sponge it doesn't need to be fancy) and pick it up using a tweezers (this will make it easier to manoeuvre). Dip the sponge in your lilac paint and then gently sponge it on in small circular sections sporadically across your three nails. Try to make them look as irregular in size as Sulley's are, also don't worry too much about getting perfect circles of pure lilac as you want to make it look a little like scruffy fur!
This was far less time consuming to do. Apply the following steps to all the fingers painted in your lighter blue colour (in my case, 'Misty Jade'). Take a small sponge (you could even cut the corner off of a kitchen sponge it doesn't need to be fancy) and pick it up using a tweezers (this will make it easier to manoeuvre). Dip the sponge in your lilac paint and then gently sponge it on in small circular sections sporadically across your three nails. Try to make them look as irregular in size as Sulley's are, also don't worry too much about getting perfect circles of pure lilac as you want to make it look a little like scruffy fur!
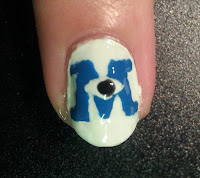
Our final piece of detail in this design is on the middle finger. Here we'll paint the 'M' at the start of Monsters University.
.jpg)
This part is pretty simple, you take a cocktail stick (or striper brush) dip it in the darker blue and paint a solid capital 'M' over the white polish. Once dry, you paint a small white oval in the centre of the 'M'. Taking your cocktail stick again you do a small black dot within the white oval.
Once all these little details have dried you can take your top coat (for me, it's my Sally Hansen 4-in-1) and paint over each nail sealing in the colour and protecting the layers of paint. Then you can take a cotton bud, dip it into nail polish remover and sweep along the sides of your nails to fix up any messy bits!

And there you have it! You've nailed a Monsters University nail art look in no time!


.jpg)
No comments:
Post a Comment